Upload Methods
MyData supports two methods for uploading data to MyTardis:
- HTTP POST
- SCP via Staging
“HTTP POST” (MyData’s default upload method) is automatically enabled as soon as you have entered some basic settings into MyData (see Settings and Downloading and installing the demo configuration for MyData). The “HTTP POST” method is easy to get up and running quickly for trying out MyData with small datasets.
But for large datasets and large datafiles, the “SCP via Staging” method is preferred for the following reasons:
- For large datafile uploads (multiple gigabytes), the “HTTP POST” method can put significant strain on the MyTardis server’s memory, affecting all users connecting to that MyTardis server.
- Partially complete uploads can be resumed when using “SCP via Staging”, but not when using “HTTP POST”.
- The “HTTP POST” method only allows one concurrent upload, because it uses the “poster” Python library, which uses “urllib2” which is not thread-safe.
Concurrent Upload Threads and Subprocesses launched by MyData
The maximum number of upload threads can be specified in the advanced tab of MyData’s Settings Dialog (see Advanced). This setting will have no effect when using the “HTTP POST” upload method, which has a maximum of one concurrent upload.
When using multiple upload threads, you won’t see multiple “MyData” processes running in your process monitor / task manager, but you will see multiple “scp” (secure copy) processes running which are launched from “MyData” as subprocesses. You may also see multiple “ssh” processes which are used to run remote commands on MyTardis’s staging server to determine the size of an incomplete upload on MyTardis’s staging server and to append an uploaded chunk to a partially uploaded datafile in MyTardis’s staging area.
While using MyData’s “SCP to Staging” upload method, you may also notice a “dd” subprocess running for each upload. “dd” is used to extract a chunk to upload from a datafile.
On Mac OS X, in addition to the brief “ssh” processes described above, you may also notice some lingering “ssh” processes (one per upload thread), which are used to set up a “ControlMaster” ssh process (see http://www.openbsd.org/cgi-bin/man.cgi?query=ssh_config), which allows MyData to reuse an existing SSH connection for appending additional datafile chunks to a partial upload.
OpenSSH’s ControlMaster/ControlPath functionality is not available in Windows builds of OpenSSH: http://stackoverflow.com/questions/20959792/is-ssh-controlmaster-with-cygwin-on-windows-actually-possible So we can’t use this method to reuse SSH connections for SCP-uploading subsequent datafile chunks on Windows. Out of necessity, MyData creates a new SSH (“SCP”) connection for every chunk uploaded, at least it does for large datafiles.
For small datafile uploads on Windows, if the chunk size is too small, then calling “scp.exe” repeatedly will waste time reconnecting to the same MyTardis staging server repeatedly after only spending a fraction of a second actually uploading each chunk. If the chunk size is too large, then MyData won’t be able to display smooth progress updates. For small datafiles on Windows (less than 10 MB), MyData upload the entire datafile with one call to “scp.exe”, so you won’t see incremental progress updates in MyData’s Uploads view.
HTTP POST
MyData’s “HTTP POST” upload method uses the “Via multipart form POST” method of MyTardis’s RESTful API. For more details, see: https://mytardis.readthedocs.org/en/latest/api.html#via-multipart-form-post
SCP to Staging
MyData’s “SCP to Staging” upload method uses the “Via staging location” method of MyTardis’s RESTful API. For more details, see: https://mytardis.readthedocs.org/en/latest/api.html#via-staging-location
When using the “SCP to Staging” method, MyData informs MyTardis of its intention to upload a datafile (and registers the filename, size and checksum in a Datafile record in MyTardis), and MyTardis then supplies MyData with a temporary location to upload the datafile to. MyData will be granted access to upload the datafile to that temporary location using scp (secure copy). The server which MyData connects when uploading via scp (known as the “staging server”) may be the same as the MyTardis server, or it may be a different server which mounts the same storage as MyTardis. MyTardis runs scheduled background tasks to check for datafiles which have been registered but not yet verified, and for unverified datafiles which were to be uploaded via staging, MyTardis will copy the uploaded datafile from the staging area to its final destination (MyTardis’s file store) while checking its size and calculating its MD5 checksum to verify its integrity.
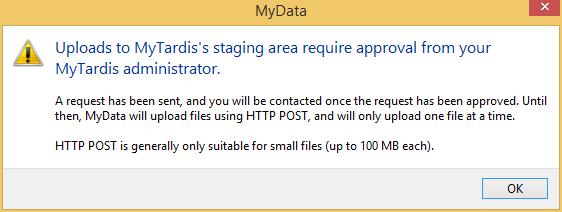
The first time a user runs MyData, they wil see a warning indicating that MyData’s preferred upload method (SCP via staging) hasn’t yet been approved by the MyTardis administartor:
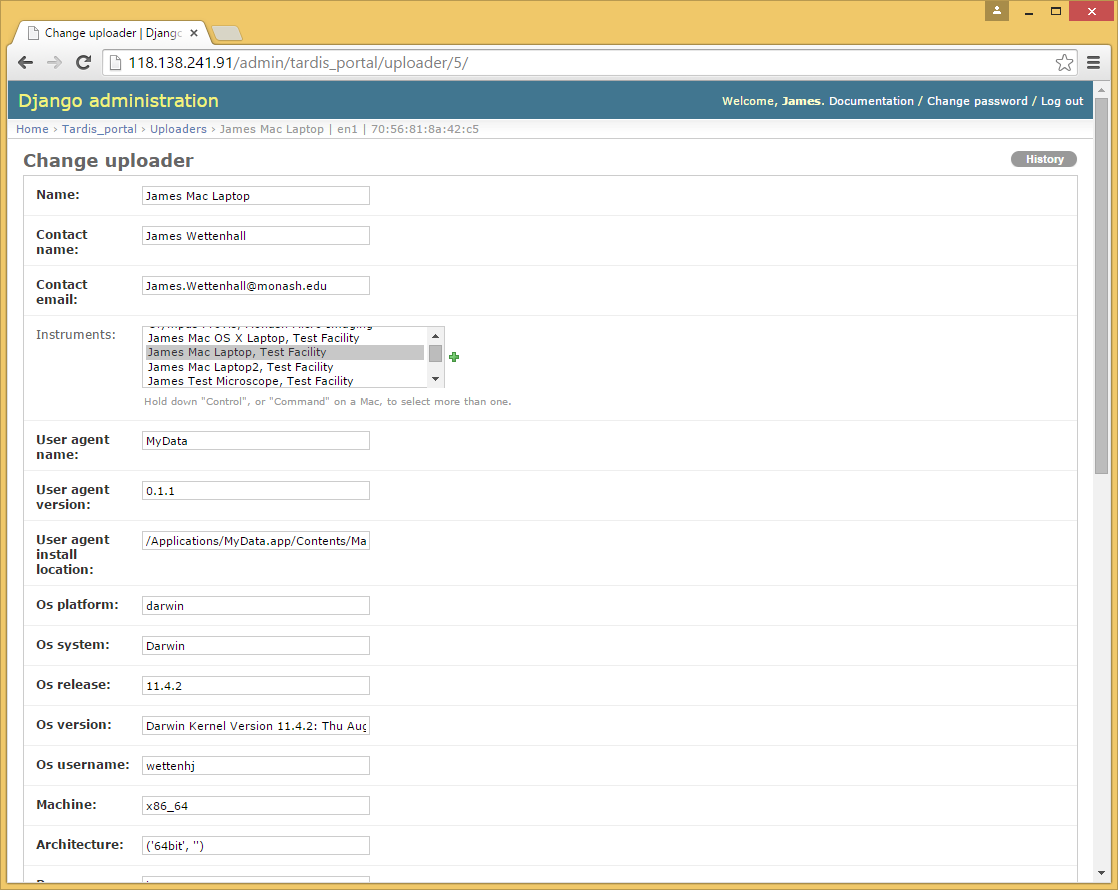
MyData uploads some basic information about the instrument PC and about the MyData installation to its MyTardis server. This basic information is called an “uploader” record. Once an uploader record has been created in MyTardis, no other users (of MyTardis’s RESTful API) will be able to access the uploader record unless they know its MAC address, a unique string associated with the MyData user’s active network interface (Ethernet or WiFi). A single MyData user could create multiple uploader records from each PC they run MyData on, one for each network interface on each PC.
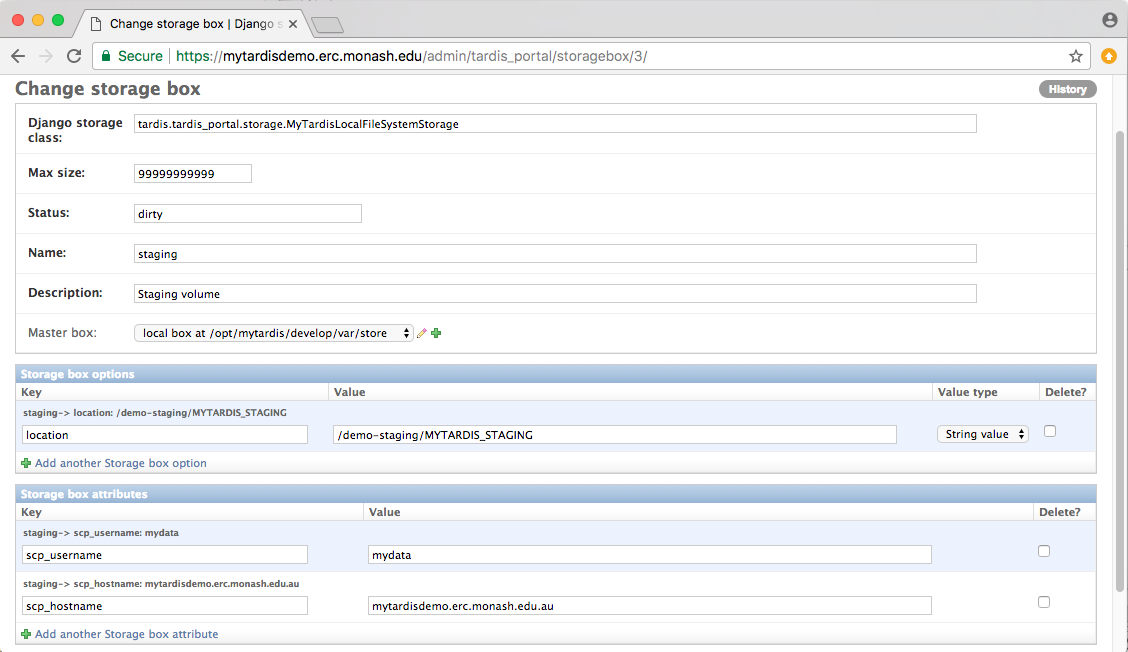
The MyTardis administrator can approve the request in the Django Admin interface (after adding the public key to the appropriate /home/mydata/.ssh/authorized_keys file):
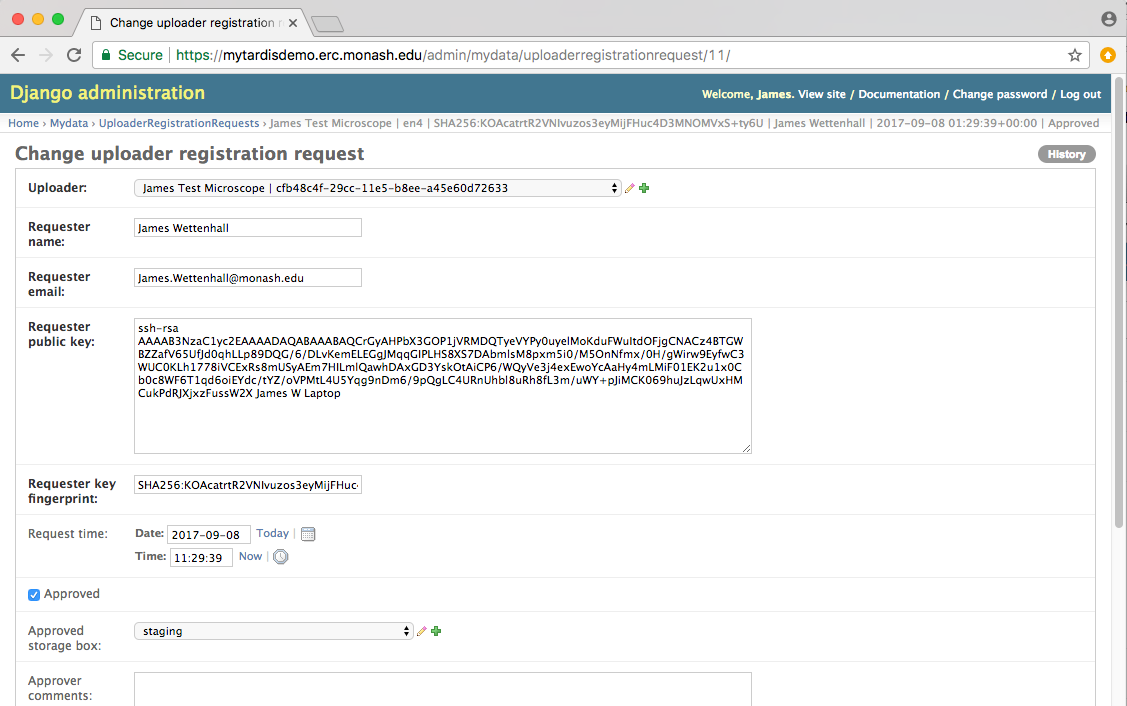
While approving the request, the MyTardis administrator can assign an appropriate storage box to the MyData uploader. In this case, the “staging” storage box has been selected. This storage box has attributes for “scp_username” and “scp_hostname” (and optionally “scp_port” which defaults to 22). It is the MyTardis administrator’s responsibility to paste the public key into the appropriate authorized_keys file to allow MyData to upload without a password.
Below is a sample of a MyTardis administrator’s notes made (in the approval_comments field in MyTardis’s UploadRegistrationRequest model) when approving one of these upload requests:
Ran the following as root on the staging host (118.138.241.33) :
$ adduser mydata
$ mkdir /home/mydata/.ssh
$ echo "ssh-rsa AAAAB3NzaC... MyData Key" > /home/mydata/.ssh/authorized_keys
$ chown -R mydata:mydata /home/mydata/.ssh/
$ chmod 700 /home/mydata/.ssh/
$ chmod 600 /home/mydata/.ssh/authorized_keys
$ usermod -a -G mytardis mydata
The MyData client will need to create subdirectories within the MyTardis staging area, and it will need to be able to write within those subdirectories. The “mytardis” web user should have read access to the staging data, but the “mydata” user should not have write access to the permanent storage location.
To ensure that MyTardis’s Celery processes (running under the “mytardis” account) have access to the uploaded files via group ownership, we can set the “setgid” bit (chmod g+s or chmod 2770) on the staging directory so that all files created within staging can inherit the “mytardis” group.
Previous versions of MyData’s documentation recommended using “umask” to ensure that files uploaded by MyData were group readable (so that MyTardis could verify them) and group writeable (so that MyTardis could move them to their permanent storage box). However, from v0.7.0, MyData explicitly sets permissions on files it uploads (and on subddirectories it creates), instead of assuming that umask has been configured to do this automatically.
N.B.: The test below was only possible because the MyData user submitting the request and the MyTardis administrator approving the request were the same person. Normally, the MyTardis administrator wouldn’t have access to the MyData user’s private key.
Because in this case, I had access to the private key generated by the MyData instance submitting the uploader registration request, I was able to test SSHing into the staging host from my MyData test machine using the SSH private key which MyData generated in ~/.ssh/:
$ ssh -i ~/.ssh/MyData mydata@118.138.241.33
[mydata@118.138.241.33 ~]$ groups
mydata mytardis
[mydata@118.138.241.33 ~]$ ls -lh /mnt/sonas/market | grep MYTARDIS
drwx------ 403 mytardis mytardis 128K Nov 12 14:33 MYTARDIS_FILE_STORE
drwxrws---   3 mytardis mytardis  32K Nov 13 15:36 MYTARDIS_STAGING
[mydata@118.138.241.33 ~]$ touch /mnt/sonas/market/MYTARDIS_STAGING/test123.txt
[mydata@118.138.241.33 ~]$ rm /mnt/sonas/market/MYTARDIS_STAGING/test123.txt
Note the permissions above - being part of the “mytardis” group on this staging host allows the “mydata” user to write to the MYTARDIS_STAGING directory, but not to the MYTARDIS_FILE_STORE directory. The ‘s’ in the “MYTARDIS_STAGING” directory permission ensures that all subdirectories created by the “mydata” user will inherit the MYTARDIS_STAGING directory’s group (“mytardis”), instead of the mydata user’s default group (“mydata”).
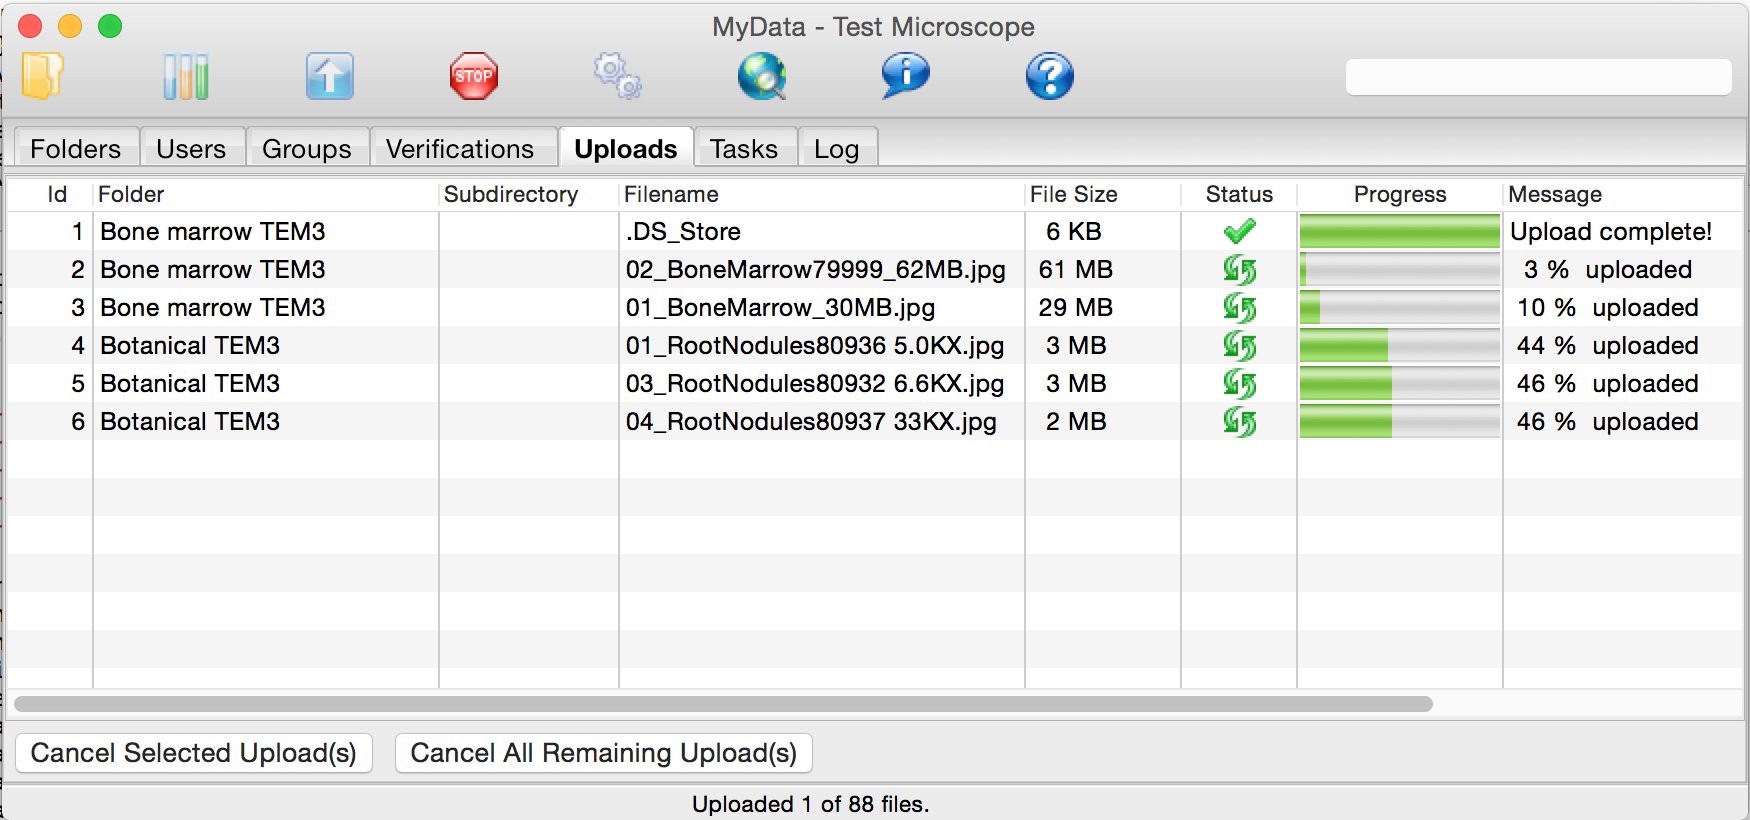
Once uploads to staging have been approved, MyData can manage multiple uploads at once (5 by default):